Configuration
Examples on this page use the PyPI command spotify_profile_monitor. Manual script users should keep the shown options and use the matching prefix under Command Format by Installation Method.
Configuration File
You can pass most settings as command-line options or save them in a configuration file for later runs.
The easiest way to create this file is spotify_profile_monitor --setup.
To edit every available setting yourself, generate a default configuration file:
# On macOS, Linux or Windows Command Prompt (cmd.exe)
spotify_profile_monitor --generate-config > spotify_profile_monitor.conf

# On Windows PowerShell (recommended to avoid encoding issues)
spotify_profile_monitor --generate-config spotify_profile_monitor.conf
Windows PowerShell: Pass the filename directly to
--generate-config. PowerShell redirection can write UTF-16, which the tool rejects with a "null bytes" error.
When the named file already exists, --generate-config asks before replacing it and keeps a timestamped .bak backup next to it. Add --force to replace it without the question.
The file contains a short explanation above each setting.
A configuration file is read as data, not executed. The tool accepts only SETTING = value lines where the name is one of the documented settings and the value is a plain literal such as a string, number, True, False, None, a list or a dictionary. Comments and blank lines are fine.
Imports, function calls, expressions and unknown settings are rejected with the setting and line number to correct.
If the same setting appears in more than one place, the item later in this list wins:
- Built-in defaults
- The discovered or explicitly selected configuration file
- Values from the selected
.envfile - Secret environment variables
- Command-line options
By default the tool looks for a configuration file named spotify_profile_monitor.conf in the current directory, the home directory (~) and the script directory. Use --config-file to name another location or --config-file none to disable automatic config discovery for one run.
Monitored Target
The Spotify target is a positional argument. It is required to start monitoring:
The target can be a complete profile URL, a spotify:user: URI or a user ID.
To stop repeating it, save it in the configuration file:
TARGET_USER_URI_ID accepts the same forms as the command line. Then spotify_profile_monitor alone starts monitoring that user. A positional argument still wins, so you can watch someone else for one run without editing the file:
How to Find a Friend's Spotify Profile URL
The easiest way is via the Spotify desktop or mobile client: - go to your friend's profile - click the three dots (•••) or press the Share button - copy the link to the profile
You'll get a URL like https://open.spotify.com/user/USER_ID?si=tracking_id.
Pass that profile URL directly to the tool. You do not need to extract the ID. Spotify user URIs such as spotify:user:USER_ID and standalone user IDs are also accepted.
Alternatively you can use the built-in username search (-s) to find a Spotify user ID:
It lists matching users with their Spotify user IDs and profile URLs. Any listed profile URL or ID can then be used as the monitoring target.
Before using this feature make sure you followed the instructions here.
Spotify Access Token Source
The tool supports four methods for obtaining a Spotify access token.
Public playlist details use an automatic backend. If working OAuth app credentials are configured, the tool first preserves the legacy Web API behavior. If Spotify returns a restricted response or if no app credentials are configured, the tool retrieves public playlist metadata and contents through the Spotify web-player service. The web backend discovers the current persisted-query hash automatically and does not require a Spotify app or Premium subscription.
OAuth app guidance: Spotify restricted new Development Mode apps created on or after February 11, 2026. Some older apps have been observed to retain the legacy endpoint access used by this tool, but creation date alone does not guarantee compatibility. Configure
oauth_apponly if you already have an app which you have verified still works. If it returns HTTP 403 then remove the OAuth app credentials and let the automatic web backend handle public playlists. See Spotify's official migration guide.
The token source method can be configured via the TOKEN_SOURCE configuration option or the --token-source flag.
Recommended: cookie
Uses the sp_dc cookie to retrieve a token from the Spotify web endpoint. This method is easy to set up and supports all features except fetching the list of liked tracks for the account that owns the access token (due to recent Spotify token's scope restrictions).
Since version 3.1, due to Spotify restrictions introduced on December 22, 2025, it no longer shows other users' playlists added to a user's profile unless the user is a collaborator on a playlist owned by another user.
Alternative: client
Uses captured credentials from the Spotify desktop client and a Protobuf-based login flow. It's more complex to set up, but supports all features. This method is intended for advanced users who want a long-lasting token with the broadest possible access.
Since version 3.1, due to Spotify restrictions introduced on December 22, 2025, it no longer shows other users' playlists added to a user's profile unless the user is a collaborator on a playlist owned by another user.
Optional legacy: oauth_app
Relies on the official Spotify Web API Client Credentials flow. This mode is retained for existing apps which still have verified access to the legacy endpoints. It is not required for cookie or client mode and is not recommended for a new setup.
As a standalone token source it can monitor other users only when the existing app still retains the removed GET /users/{id} access. New Development Mode apps cannot use this workflow. The following features are also not supported:
- viewing the list of followers/followings
- accessing the followings count (only the followers count is tracked; post-Feb 2026: followers count also not available)
- getting the list of recently played artists
- showing other users' playlists added to user profile (unless the user is a collaborator on a playlist owned by other user)
- fetching the list of liked tracks for the account that owns the access token
- searching for Spotify users by name
Use cookie or client for normal monitoring. Add oauth_app credentials only as an optional legacy Web API path after verifying that the existing app still works.
Personal: oauth_user
Uses Authorization Code OAuth to read the authenticated user's own profile, playlists, liked tracks, recent listening and followed artists.
OAuth does not supply follower lists or followed-user lists. Followings in this mode are artists only. Follower counts are shown when Spotify supplies them, otherwise they appear as n/a.
Private playlists can be listed with the required playlist scopes. Playlist contents use the current /items endpoint and accept both current and older response fields. An older /tracks endpoint is tried if the app does not expose the current route. A restriction on one playlist does not disable OAuth reads for other playlists. Restricted playlists use the web-player fallback and their OAuth access is checked again after five minutes.
In Development Mode, Spotify limits playlist contents to playlists the authorized user owns or collaborates on and removes other-user profile/listing endpoints. The app owner must have Premium. These are app-mode restrictions, not a reason to assume every OAuth endpoint is unavailable. See Spotify's migration guide. Use cookie or client for monitoring other users.
If no method is specified, the tool defaults to the cookie method.
Important: It is strongly recommended to use a separate Spotify account with this tool if you obtain access tokens via the cookie or client methods. These methods interact with internal undocumented endpoints for features such as followers, followings and recently played artists. The automatic public playlist backend also uses an undocumented Spotify web-player interface. Spotify may change or restrict these interfaces in the future.
Spotify sp_dc Cookie
This is the default method used to obtain a Spotify access token.
Import a browser login instead of extracting the cookie by hand. Firefox import works on macOS, Linux and Windows without an optional package.
Before importing, open Spotify Web Player in the browser you want to use and sign in to the Spotify account you want to monitor with. Then return to the terminal and run the import command.
Which browsers are supported
The --browser flag accepts these values:
--browser |
Application it reads | Platforms |
|---|---|---|
firefox (default) |
Mozilla Firefox | macOS, Linux, Windows |
chrome |
Google Chrome | macOS, Linux |
brave |
Brave | macOS, Linux |
chromium |
The standalone open-source Chromium browser | macOS, Linux |
About chromium: Chromium is a separate browser application from Google Chrome. It has its own profiles and cookies. Choose chromium only if that is the browser you use. Choose chrome for Google Chrome.
Not currently supported: Microsoft Edge, Opera, Vivaldi, Arc and other Chromium-based browsers. Each application stores its cookies separately. The pycookiecheat library used by Spotify Profile Monitor supports only the browsers in the table. To import a login, use one of those supported browsers.
On Windows, Chrome 127 and newer prevent external programs from reading these cookies through app-bound encryption. Use Firefox import instead.
On Windows, Firefox from the regular installer and from the Microsoft Store are both discovered. The Store package keeps its profiles under %LOCALAPPDATA%\Packages\Mozilla.Firefox_*\LocalCache\Roaming\Mozilla\Firefox, and its profiles are listed as [Microsoft Store] so the default-release that both installs create can be told apart. A redirected APPDATA or LOCALAPPDATA is followed as well as the home-relative location.
On Linux, Firefox profiles installed natively, through Snap or through Flatpak are discovered automatically. On every platform, the importer reads profiles.ini and normal profile directories. If one usable profile exists it is selected automatically. If several profiles exist an interactive terminal shows a numbered choice. For scripts or other noninteractive runs select one by its friendly name or directory basename:
spotify_profile_monitor --import-browser-cookie --browser firefox --browser-profile "default-release"
For a custom Firefox layout, the advanced --cookie-file PATH option points directly to a cookies.sqlite database. It overrides automatic profile selection:
spotify_profile_monitor --import-browser-cookie --browser firefox --cookie-file /path/to/cookies.sqlite
By default, import writes only SP_DC_COOKIE to .env in the current directory. Use --env-file PATH to choose another .env file. Import does not change a file found only in a parent directory. --env-file none is invalid because the imported cookie must be saved.
Import validates the login before saving and asks before replacing a saved cookie. For noninteractive replacement, pass --force. This still validates the cookie and preserves unrelated .env settings.
When a browser holds several profiles, import lists them and asks which to use. A * marks each profile that holds a
current Spotify login. When exactly one does, it is preselected and Enter accepts it. An invalid answer is asked
again rather than ending the import. Answer 0 to cancel.
Chrome, Brave and Chromium import is available on macOS and Linux through the optional browser extra:
pip install "spotify_profile_monitor[browser]"
spotify_profile_monitor --import-browser-cookie --browser chrome
Select a Chromium browser profile by its directory name, such as Default or Profile 1. Friendly names are also accepted.
On Linux, Brave and Chromium installed from Snap or Flatpak keep their profiles outside the usual ~/.config location. Import searches those locations too, so no extra option is needed.
Manual cookie extraction
Use manual extraction when browser import is unavailable. Treat sp_dc like a password because it represents a Spotify login session.
Follow these steps:
- Open Spotify Web Player and sign in to the Spotify account you want to use for monitoring.
- Open your browser's developer tools. Press
F12orCtrl+Shift+Ion Windows and Linux. PressCommand+Option+Ion macOS. - In Firefox, open Storage > Cookies >
https://open.spotify.com. - In Chrome, Brave or Chromium, open Application > Storage > Cookies >
https://open.spotify.com. - Find the cookie named
sp_dcand copy only its Value. Do not copy the cookie name or the complete table row. - Run the private entry command then paste the copied value at its hidden prompt:
The command validates the cookie and saves SP_DC_COOKIE to .env. Use --env-file PATH for another destination.
As an alternative, Cookie-Editor by cgagnier can display the sp_dc value. Only use a browser extension that you trust because browser extensions can access sensitive login cookies.
You can provide SP_DC_COOKIE in these ways:
- Run
spotify_profile_monitor --set-sp-dcto enter it privately, validate it with Spotify then save it to a dotenv file. This is recommended. - Add
SP_DC_COOKIE="your_sp_dc_cookie_value"directly to a dotenv file for persistent use. - Set it as an environment variable, for example
export SP_DC_COOKIE="your_sp_dc_cookie_value". - Pass it for one run with
-uor--spotify-dc-cookie. This is not recommended because the value may appear in shell history or process listings. - Store it in the configuration file or source code as a last resort. This is not recommended because it is easier to expose or commit accidentally.
If your sp_dc cookie expires, the tool reports the error in the console and sends it through each enabled notification channel: email, Discord or ntfy. In that case, you'll need to grab the new sp_dc cookie value.
If you store the SP_DC_COOKIE in a dotenv file you can update its value and send a SIGHUP signal to reload the file with the new sp_dc cookie without restarting the tool. More info in Storing Secrets and Signal Controls (macOS/Linux/Unix).
NOTE: Spotify still requires TOTP parameters for web-player token requests. The web player continues to select v61 which was first published in January 2026. Version 3.5 embeds v61 directly and no longer downloads a third-party secret dictionary. The version and cipher bytes are exposed as the
TOTP_VERSIONandTOTP_SECRET_CIPHER_BYTESconfig options, so if Spotify resumes rotation you can patch them from the config file without a code release. Use spotify_monitor_secret_grabber to extract the current bundle values then update those two options.
Spotify Desktop Client
This is the alternative method used to obtain a Spotify access token which simulates a login from the real Spotify desktop app using credentials intercepted from a real session.
-
Run an intercepting proxy of your choice (like Proxyman - the trial version is sufficient)
-
Enable SSL traffic decryption for
spotify.comdomain -
in Proxyman: click Tools → SSL Proxying List → + button → Add Domain → paste
*.spotify.com→ Add -
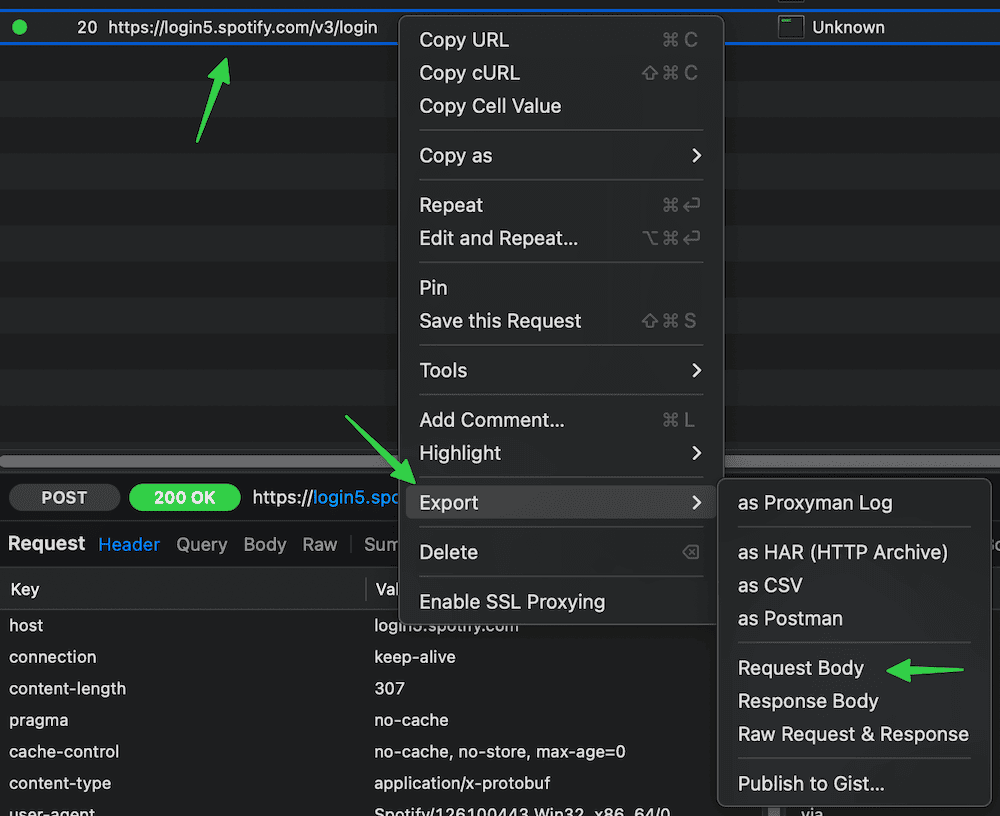
Launch the Spotify desktop client, then switch to your intercepting proxy (like Proxyman) and look for POST requests to
https://login5.spotify.com/v3/login -
If you don't see this request, try following steps (stop once it works):
- restart the Spotify desktop client
- log out from the Spotify desktop client and log back in
- point Spotify at the intercepting proxy directly in its settings, i.e. in Spotify → Settings → Proxy Settings, set:
- proxy type:
HTTP - host:
127.0.0.1(IP/FQDN of your proxy, for Proxyman use the IP you see at the top bar) - port:
9090(port of your proxy, for Proxyman use the port you see at the top bar) - restart the app; since QUIC (HTTP/3) requires raw UDP and can't tunnel over HTTP CONNECT, Spotify will downgrade to TCP-only HTTP/2 or 1.1, which intercepting proxy can decrypt
- proxy type:
- block Spotify's UDP port 443 at the OS level with a firewall of your choice - this prevents QUIC (HTTP/3), forcing TLS over TCP and letting intercepting proxy perform MITM
-
try an older version of the Spotify desktop client
-
Export the login request body (a binary Protobuf payload) to a file (e.g. login-request-body-file)
- In Proxyman: right click the request → Export → Request Body → Save File.
- Run the tool with
--token-source client -w <path-to-login-request-body-file>:
If successful, the tool will automatically extract the necessary fields and begin monitoring.
When -w is used on its own to inspect a Protobuf file, the extracted refresh token is masked. Add --verbose to print the full value when you need to copy it into your configuration.
Instead of using the -w flag each time, you can persist the Protobuf login request file path by setting the LOGIN_REQUEST_BODY_FILE configuration option.
The same applies to --token-source client flag - you can persist it via TOKEN_SOURCE configuration option set to client.
The tool will automatically refresh both the access token and client token using the intercepted refresh token.
If your refresh token expires, the tool reports the error in the console and sends it through each enabled notification channel: email, Discord or ntfy. In that case, you'll need to re-export the login request body.
If you re-export the login request body to the same file name, you can send a SIGHUP signal to reload the file with the new refresh token without restarting the tool. More info in Signal Controls (macOS/Linux/Unix).
Advanced options are available for further customization - refer to the configuration file comments. However, the default settings are suitable for most users and modifying other values is generally NOT recommended.
Spotify OAuth App
OAuth app credentials are not required for public playlist retrieval. This section is retained only for users who already have a verified legacy-compatible app or want to test standalone Client Credentials behavior.
Do not create a new Spotify app solely for spotify_profile_monitor. Apps created under the current Development Mode restrictions cannot provide the removed public user endpoints needed for standalone monitoring of other users.
If you already have a working existing app:
-
Log in to Spotify Developer dashboard
-
Open the existing app which still has verified legacy endpoint access
-
Copy the Client ID and Client Secret
-
Provide the
SP_APP_CLIENT_IDandSP_APP_CLIENT_SECRETsecrets using one of the following methods: - Pass it at runtime with
-r/--oauth-app-creds(useSP_APP_CLIENT_ID:SP_APP_CLIENT_SECRETformat - note the colon separator) - Set it as an environment variable (e.g.
export SP_APP_CLIENT_ID=...; export SP_APP_CLIENT_SECRET=...) - Add it to .env file (
SP_APP_CLIENT_ID=...andSP_APP_CLIENT_SECRET=...) for persistent use - Fallback: hard-code it in the code or config file
Optional legacy example:
spotify_profile_monitor --token-source oauth_app -r "your_spotify_app_client_id:your_spotify_app_client_secret" <spotify_target>
The tool automatically refreshes the OAuth app access token, so it remains valid indefinitely. Tokens are cached in the file specified by SP_APP_TOKENS_FILE configuration option (default: .spotify-profile-monitor-oauth-app.json).
If you store the SP_APP_CLIENT_ID and SP_APP_CLIENT_SECRET in a dotenv file you can update their values and send a SIGHUP signal to reload the file with the new secret values without restarting the tool. More info in Storing Secrets and Signal Controls (macOS/Linux/Unix).
You can use this method as a standalone token source only when the existing app still retains all endpoints required for your selected operation. If it returns HTTP 403 use cookie or client without OAuth app credentials.
Spotify OAuth User
This method uses an official Spotify Web API (Authorization Code OAuth flow).
-
Log in to Spotify Developer dashboard: https://developer.spotify.com/dashboard
-
Create a new app
-
For Redirect URL, use: http://127.0.0.1:1234
- The URL must match exactly as shown, including not having a / at the end
-
When copying the link via right-click, some browsers may add an extra / to the URL
-
Select Web API as the intended API
-
Copy the Client ID and Client Secret (the secret is not required if you're using
PKCEmode) -
Provide the
SP_USER_CLIENT_IDandSP_USER_CLIENT_SECRETsecrets using one of the following methods: - Pass it at runtime with
-n/--oauth-user-creds- Use
SP_USER_CLIENT_ID:SP_USER_CLIENT_SECRETformat - note the colon separator
- Use
- Set it as an environment variable (e.g.
export SP_USER_CLIENT_ID=...; export SP_USER_CLIENT_SECRET=...) - Add it to .env file (
SP_USER_CLIENT_ID=...andSP_USER_CLIENT_SECRET=...) for persistent use - Fallback: hard-code it in the code or config file
To use PKCE mode, set SP_USER_CLIENT_SECRET to an empty string ("").
You can use the same client ID and secret values as those used for the Spotify OAuth App.
Example:
spotify_profile_monitor --token-source oauth_user -n "your_spotify_user_client_id:your_spotify_user_client_secret" <spotify_target>
The tool takes care of refreshing the access token so it should remain valid indefinitely.
If you store the SP_USER_CLIENT_ID and SP_USER_CLIENT_SECRET in a dotenv file you can update their values and send a SIGHUP signal to reload the file with the new secret values without restarting the tool. More info in Storing Secrets and Signal Controls (macOS/Linux/Unix).
Spotify sha256 (optional)
This step is optional and required only for the username search feature (-s). To use it, intercept your Spotify client's network traffic and extract the required sha256Hash value.
-
Run an intercepting proxy of your choice (like Proxyman).
-
Launch the Spotify desktop client and search for some user
-
Look for requests with the
searchUsersorsearchDesktopoperation name -
Display the details of one of these requests and copy the sha256Hash parameter value (string marked as
XXXXXXXXXXbelow)
Example request:
https://api-partner.spotify.com/pathfinder/v1/query?operationName=searchUsers&variables={"searchTerm":"spotify_user_uri_id","offset":0,"limit":5,"numberOfTopResults":5,"includeAudiobooks":false}&extensions={"persistedQuery":{"version":1,"sha256Hash":"XXXXXXXXXX"}}
- Provide the
SP_SHA256secret using one of the following methods: - Set it as an environment variable (e.g.
export SP_SHA256=...) - Add it to .env file (
SP_SHA256=...) for persistent use - Fallback: hard-code it in the code or config file
Time Zone
By default, time zone is auto-detected using tzlocal. You can set it manually in spotify_profile_monitor.conf:
You can get the list of all time zones supported by pytz like this:
SMTP Settings
Email notifications need SMTP server details for the sending account. Add them to spotify_profile_monitor.conf or use the setup wizard. Setup checks the login without sending an email. To replace only the password, run spotify_profile_monitor --set-smtp-password. Password entry is hidden and preserves spaces.
If email alerts are selected but local SMTP settings are missing or invalid, the startup summary shows Unavailable with the reason. Automatic email sends are skipped silently until the settings are fixed. Off means no email alert types are selected.
Every alert is sent as both HTML and plain text in one message. Mail clients that render HTML show the monitored user, the changed value and the check interval in bold, with each follower, following, playlist and track linked to its Spotify page. Clients that do not fall back to the plain text, which is unchanged.
Send one test message to verify the settings:
Webhook Settings
Spotify Profile Monitor can send profile, follower and error alerts through Discord or the native ntfy publish API. Webhook delivery works with or without email.
WEBHOOK_PROVIDER selects the request format. It defaults to "discord". Standard Discord and public ntfy.sh URLs automatically select the matching format if this configured value is stale. While WEBHOOK_PROVIDER is left at its default, that detection is silent and --verbose reports it. A warning appears only when your configuration file sets a provider the URL disagrees with. Self-hosted ntfy and compatible endpoints still use the configured provider. Use --webhook-provider discord or --webhook-provider ntfy for an explicit one-run override.
ntfy
Choose a hard-to-guess topic. Public ntfy.sh URLs are recognized automatically. Set the provider to "ntfy" for a self-hosted ntfy server:
Save its complete HTTPS topic URL through the same hidden prompt:
For ntfy.sh the value looks like https://ntfy.sh/spotify-profile-monitor-long-random-value. Self-hosted ntfy servers also require a complete HTTPS topic URL.
Spotify Profile Monitor sends the alert body as a native UTF-8 ntfy message and the alert subject as its title. Query parameters already in the topic URL are preserved. Long ntfy messages are visibly truncated below ntfy's 4 KB boundary so they remain notifications instead of temporary attachments.
The ntfy provider needs no request template. WEBHOOK_TEMPLATE, WEBHOOK_USERNAME and WEBHOOK_AVATAR_URL shape the Discord embed only and are ignored when WEBHOOK_PROVIDER is "ntfy". To customize ntfy delivery, add ntfy options such as priority or tags through WEBHOOK_HEADERS (for example X-Priority or X-Tags).
Discord alerts carry the same emphasis as the HTML email, since Discord renders markdown in an embed. Bold values stay bold and links stay clickable. Only Discord gets that wording: ntfy receives the plain body, because it would show the markers literally.
Profile and playlist artwork is disabled by default and needs the optional artwork extra (pip install "spotify_profile_monitor[notification-images]"). Enable it in spotify_profile_monitor.conf once the extra is installed:
If the setting is on but the extra is missing, the monitor reports it at startup and sends the affected alerts as text.
The monitor accepts artwork only from Spotify HTTPS CDN hosts. It limits downloads to 5 MiB and rejects oversized decoded images before preparing each attachment in memory. If image preparation fails the alert is sent as text. If an attachment upload fails the monitor retries once as text. Self-hosted ntfy servers must allow attachments.
Protected ntfy topics can use a Bearer access token stored in .env:
NTFY_ACCESS_TOKEN takes precedence over an Authorization entry in WEBHOOK_HEADERS. Custom headers remain available for other authentication methods and compatible integrations:
Header values support the same placeholders as the Discord template ({title}, {description}, {version}, {image_url}, {color}, {timestamp} and so on) and work with both providers. Headers are validated before and after placeholder expansion so formatted values cannot add invalid names, non-string values or line breaks.
A header value that contains emoji or other non-ASCII text after placeholder expansion is sent in RFC 2047 encoded form (=?UTF-8?B?...?=), since a plain HTTP header cannot carry it. ntfy decodes it back to the original text. Other receivers see the encoded form unless they decode RFC 2047. ASCII values are sent exactly as written, including values you already encoded yourself, such as an emoji tag from the ntfy documentation.
Discord
To create a private Discord webhook URL:
- Open the Discord server and choose the channel that should receive alerts.
- Click Edit Channel then open Integrations > Webhooks.
- Click New Webhook then choose a name and click Copy Webhook URL.
- Save the URL through the hidden prompt:
The command saves only WEBHOOK_URL in .env without putting the private value in shell history. Treat this URL like a password because anyone who has it can post through it.
Keep the default request format in spotify_profile_monitor.conf:
Advanced Discord-format customization
The settings in this section apply only when WEBHOOK_PROVIDER is "discord". The ntfy provider ignores them.
WEBHOOK_USERNAME and WEBHOOK_AVATAR_URL control the sender name and HTTPS avatar for Discord-format payloads:
WEBHOOK_USERNAME = "Spotify Profile Monitor"
WEBHOOK_AVATAR_URL = "https://example.com/path/avatar.png"
WEBHOOK_TEMPLATE controls the Discord-format request body. Supported placeholders are title, description, version, image_url, fields, fields_str, color, timestamp, username and avatar_url.
Discord templates must produce a JSON object. Use a dictionary or a JSON string encoding an object, including legacy strings with doubled object braces. Lists, non-JSON strings and unsupported placeholders are rejected before delivery. Alert text is kept literal and all payloads replace allowed_mentions with {"parse": []} so alert text cannot trigger Discord mentions. Reloaded settings apply to the next delivery.
WEBHOOK_TRANSFORMS applies string methods to shared placeholder values before the template and headers are rendered:
WEBHOOK_TRANSFORMS = [
    ("title", "upper"),
    ("description", "replace", "**", ""),
    ("description", "strip"),
]
The tuple format is (field_to_target, method_name, *optional_arguments). Invalid templates, avatar URLs, transforms or formatted headers fail before a webhook request is attempted.
For automation or one-time testing --webhook-url URL overrides the destination without changing .env. The URL may remain visible in shell history or process listings:
spotify_profile_monitor --webhook-provider ntfy --webhook-url "https://ntfy.sh/your-private-topic" --send-test-webhook
For normal setup use the hidden command then send a test:
Email and webhook delivery are independent. A failure in one channel does not stop the other channel.
Webhook requests do not follow redirects, so WEBHOOK_HEADERS credentials and alert content can never be handed to a host you did not configure. If your destination answers with a redirect, delivery fails with a message telling you to save the final URL. Save it with --set-webhook-url then confirm with --send-test-webhook.
JSON History Directory
Set JSON_DIR to keep the follower, following and playlist history files outside the current working directory:
The directory is created when monitoring starts. The three spotify_profile_<user_id/file_suffix>_*.json history files are read from and written directly inside it. Leave JSON_DIR = "" to preserve the earlier behavior and use the current working directory.
Config values cannot refer to another setting or use an f-string, so paths for logs, CSV exports, OAuth files and other destinations must each be written as complete quoted strings.
Terminal Colours
COLORED_OUTPUT controls whether live terminal output is coloured. It defaults to True and is read before the startup banner is printed, so a configured value applies to the first line of output. --no-color disables colour for one run. Colour also switches itself off when output is redirected or piped, when TERM is unset or dumb and when the standard NO_COLOR environment variable is set. Log files are always written with the escape sequences stripped.
The --help screen is coloured too. Group headings, option names, the values those options take, the example commands and the comments above them each get their own colour, so the screen can be scanned instead of read.
COLOR_THEME overrides individual colours. It is merged over the built-in theme, so name only the parts you want to change:
Generated configuration files ship this block commented out, so the built-in defaults apply and a later change to them reaches you. Overrides you added are written back as a real block when setup rebuilds the file, so they are not lost. A configuration file written by an earlier version sets every colour explicitly and therefore keeps the old ones: delete its COLOR_THEME block to follow the current defaults, or edit the values you want to keep. Such a file still loads unchanged.
A value combines one colour with any number of style attributes, separated by spaces or +, for example "bright_cyan bold", "red underline" or "bright_magenta bold underline". An empty string leaves that part uncoloured.
| Colours | Styles |
|---|---|
black, red, green, yellow, blue, magenta, cyan, white and the matching bright_ variants such as bright_red |
bold, dim, underline, blink |
Parts with the same name mean the same thing in spotify_monitor, so a COLOR_THEME block can be shared between the two tools. Each tool lists only the parts it actually colours, so a few names appear in one and not the other.
| Theme key | Colours |
|---|---|
header |
The startup banner plus the Setup Wizard and Doctor headings |
section |
Commands the wizard tells you to run, and the Doctor section names |
username |
Spotify display names and quoted user names |
id |
Spotify user IDs and URIs. A configuration file that still sets user_uri_id keeps working |
status_active |
ACTIVE and PRIVATE MODE status words |
status_inactive |
INACTIVE status words |
status_offline |
OFFLINE status words |
status_other |
Any other reported status word |
track |
Track names in listings and other quoted names |
playlist |
Playlist names |
duration |
Playlist durations and elapsed times |
timestamp_label |
The Timestamp: label. Empty by default, so the label stays plain like in the sibling monitors |
timestamp_value |
The timestamp value |
info, error |
Informational and error lines, coloured end to end |
warning, signal |
The opening Warning: word and the name of a received signal. The rest of the line keeps the colours of the values in it |
email, webhook |
Notification delivery lines |
date, date_range |
Single dates and times, and date or hour ranges |
weekday |
The weekday column of the track listings |
boolean_true, boolean_false |
True / Enabled and False / Disabled |
count_up, count_down |
Reported changes only, such as from 10 to 12 and the (+2) / (-2) differences. A static count is left plain |
link |
URLs |
help_heading |
The --help group headings and example task names |
help_usage |
The usage: label |
help_option |
Option names such as --doctor |
help_metavar |
The value each option takes, such as a path or a number of seconds |
help_placeholder |
Values to replace in the help examples |
help_command |
The commands in the help examples |
help_comment |
The # comment above each help example |
help_default |
The (default: ...) notes |
On Windows, install the optional colorama package for the best results in the classic Command Prompt. Windows Terminal needs nothing extra.
To colour saved log files when you view them later, see Coloring Log Output with GRC.
Storing Secrets
Store SP_DC_COOKIE, SP_APP_CLIENT_ID, SP_APP_CLIENT_SECRET, SP_USER_CLIENT_ID, SP_USER_CLIENT_SECRET, REFRESH_TOKEN, SP_SHA256, SMTP_PASSWORD, WEBHOOK_URL and NTFY_ACCESS_TOKEN in environment variables or a dotenv file. Exported values override the file at startup.
Use spotify_profile_monitor --set-sp-dc to enter and validate the cookie through a hidden prompt. For the mail password, use spotify_profile_monitor --set-smtp-password after configuring the other SMTP settings. It checks sign-in before saving without sending an email.
A secret you clear, such as declining the ntfy access token during setup, has its line removed from the dotenv file rather than left behind as an empty value.
Set the needed environment variables using export on Linux/Unix/macOS/WSL systems:
export SP_DC_COOKIE="your_sp_dc_cookie_value"
export SP_APP_CLIENT_ID="your_spotify_app_client_id"
export SP_APP_CLIENT_SECRET="your_spotify_app_client_secret"
export SP_USER_CLIENT_ID="your_spotify_user_client_id"
export SP_USER_CLIENT_SECRET="your_spotify_user_client_secret"
export REFRESH_TOKEN="your_spotify_app_refresh_token"
export SP_SHA256="your_spotify_client_sha256"
export SMTP_PASSWORD="your_smtp_password"
export WEBHOOK_URL="https://discord.com/api/webhooks/your_id/your_token"
export NTFY_ACCESS_TOKEN="tk_your_ntfy_access_token"
On Windows Command Prompt use set instead of export and on Windows PowerShell use $env.
Alternatively store them persistently in a dotenv file (recommended). Create a plain text file named .env in the directory where you run Spotify Profile Monitor then add only the values you use:
SP_DC_COOKIE="your_sp_dc_cookie_value"
SP_APP_CLIENT_ID="your_spotify_app_client_id"
SP_APP_CLIENT_SECRET="your_spotify_app_client_secret"
SP_USER_CLIENT_ID="your_spotify_user_client_id"
SP_USER_CLIENT_SECRET="your_spotify_user_client_secret"
REFRESH_TOKEN="your_spotify_app_refresh_token"
SP_SHA256="your_spotify_client_sha256"
SMTP_PASSWORD="your_smtp_password"
WEBHOOK_URL="https://discord.com/api/webhooks/your_id/your_token"
NTFY_ACCESS_TOKEN="tk_your_ntfy_access_token"
By default the tool will auto-search for dotenv file named .env in current directory and then upward from it.
Commands that write a secret do not use that upward search when choosing a destination. Without --env-file, --set-sp-dc, --set-webhook-url and browser cookie import all write to .env in the current directory.
You can specify a custom file with DOTENV_FILE or --env-file flag:
You can also disable .env auto-search with DOTENV_FILE = "none" or --env-file none:
As a fallback, you can also store secrets in the configuration file or source code.
A forgotten export can shadow the dotenv file invisibly, so --debug names every secret and the source it resolved from, never the value:
[DEBUG 12:00:00] Secret resolution: name=SP_USER_CLIENT_ID, source=environment, value=set, chars=32
[DEBUG 12:00:00] Secret resolution: name=SMTP_PASSWORD, source=configuration file or command line, value=set
A secret still holding its your_... placeholder counts as unset and is left out, and a run with no secret anywhere says so on one line. A length appears only for the secrets whose length the provider issues, never for a password you chose.
Secret commands update the selected value without changing other dotenv settings. Clearing a value removes its assignment.
TLS Verification
Spotify Profile Monitor verifies the TLS certificate of every server it contacts: Spotify, the connectivity check endpoint, downloaded artwork, the mail server that delivers email alerts and, when enabled, the webhook service.
VERIFY_SSL covers every connection the tool makes, including the mail server and the OAuth token requests the Spotipy library sends. Set it to False only on a network that intercepts TLS with its own certificate authority, such as a corporate proxy. With verification off, an intercepted connection cannot be told apart from the real service.
The startup summary shows TLS verification and --doctor reports a warning while it is off.