Usage
Command Format by Installation Method
Examples use the PyPI command. For a downloaded script, run commands from the directory containing lastfm_monitor.py and keep the same arguments:
| Installation | Command |
|---|---|
| PyPI or pipx | lastfm_monitor [OPTIONS] |
| Manual script on macOS or Linux | python3 lastfm_monitor.py [OPTIONS] |
| Manual script on Windows | python lastfm_monitor.py [OPTIONS] |
For example, lastfm_monitor --setup becomes python3 lastfm_monitor.py --setup on macOS or Linux. Use python on Windows. Replace placeholders such as <lastfm_username> with a Last.fm username.
Activate the tool's virtual environment before running these commands. For a downloaded script, run them from the directory containing lastfm_monitor.py.
For first-time configuration, follow Setup & First Run. Use Doctor Preflight to check a setup before monitoring.
Monitoring Mode
To monitor specific user activity, just type Last.fm username as a command-line argument (lastfm_username in the example below):
If you have not set LASTFM_API_KEY and LASTFM_API_SECRET secrets, you can use -u and -w flags:
To provide optional Spotify OAuth app credentials for one run, use -z / --spotify-creds:
Settings come from a configuration file when one is found. Configuration File covers where the tool looks for it and how to select another one with --config-file.
If a run does not start, --doctor reports every check the tool makes before monitoring. See Doctor Preflight.
The startup summary shows the target, polling intervals, alerts, output files and enabled features. Use --verbose or --debug for all settings and secret sources. See Verbose and Debug Output.
The log file always receives the complete list, whichever view the terminal was shown, so a log attached to a bug report carries every effective setting.
To enable tracking of followers and/or followings changes:
- set TRACK_FOLLOWERS and/or TRACK_FOLLOWINGS to True
- or use the --track-followers and/or --track-followings flags
The tool runs until interrupted (Ctrl+C). Use tmux or screen for persistence.
You can monitor multiple Last.fm users by running multiple copies of the script.
The tool automatically saves its output to lastfm_monitor_<lastfm_username>.log file. It can be changed in the settings via LF_LOGFILE configuration option or disabled completely via DISABLE_LOGGING / -d flag.
Screen output can be capped with TRUNCATE_CHARS or the --truncate N flag, which cuts each printed line to that many characters. 999 auto-detects the terminal width. The log file keeps the full line either way.
Set ASCII_LOG_SEPARATORS to "Auto" (default) to use ASCII separator-only lines on Windows, "On" to use them on every operating system or "Off" to preserve Unicode separators in logs everywhere. Terminal separators stay Unicode. Log files and all other logged text remain UTF-8.
The tool also saves the last activity information (artist, track, timestamp) to lastfm_<lastfm_username>_last_activity.json file and the number and list of followings and followers to lastfm_<lastfm_username>_followings.json and lastfm_<lastfm_username>_followers.json files (if tracking is enabled), so this data can be reused if the tool is restarted.
Terminal Output
Use --help for examples grouped by task and matched to your installation.
Monitoring mode prints the settings that are actually in effect before the first check.
Optional features appear once you switch them on.
Use --verbose or --debug for the full startup summary, including output paths, notification settings, secret sources and runtime information.
Use --truncate N or TRUNCATE_CHARS to limit screen line width. Set it to 999 to detect the terminal width automatically. Truncation does not change log files and is ignored when logging is disabled with -d.
The tool clears the terminal when monitoring starts. Set CLEAR_SCREEN to False to keep whatever is already on the screen.
The screen is never cleared when output is redirected to a file or a pipe, in debug mode or for a command that prints a result and exits, such as --doctor, --help and the test senders.
Two settings add detail to what a run prints. VERBOSE_MODE adds the decisions the run made and DEBUG_MODE adds timestamped technical traces. Both are off by default, both are independent of each other and both have a flag that wins over the file, --verbose and --debug. DELIVERY_CONFIRMATIONS is on by default and controls whether verbose mode confirms each delivered email and webhook alert. See Verbose and Debug Output.
Coloured Terminal Output
Last.fm Monitor colours live terminal output and help by default. Saved log files stay plain text.
Turn colour off for one run with --no-color or permanently with COLORED_OUTPUT = False. Colour is also disabled for redirected output, NO_COLOR or an unsupported terminal. See Terminal Colours for details and Windows support.
Override individual colours with COLOR_THEME. It is merged over the built-in theme, so you only name the parts you want to change:
See Terminal Colours for every theme key and the accepted colour and style names.
Listing Mode
There is another mode of the tool that prints the recently listened tracks for the user (-l flag).
You can also add the -n flag to specify how many tracks should be displayed, by default it shows the last 30 tracks:
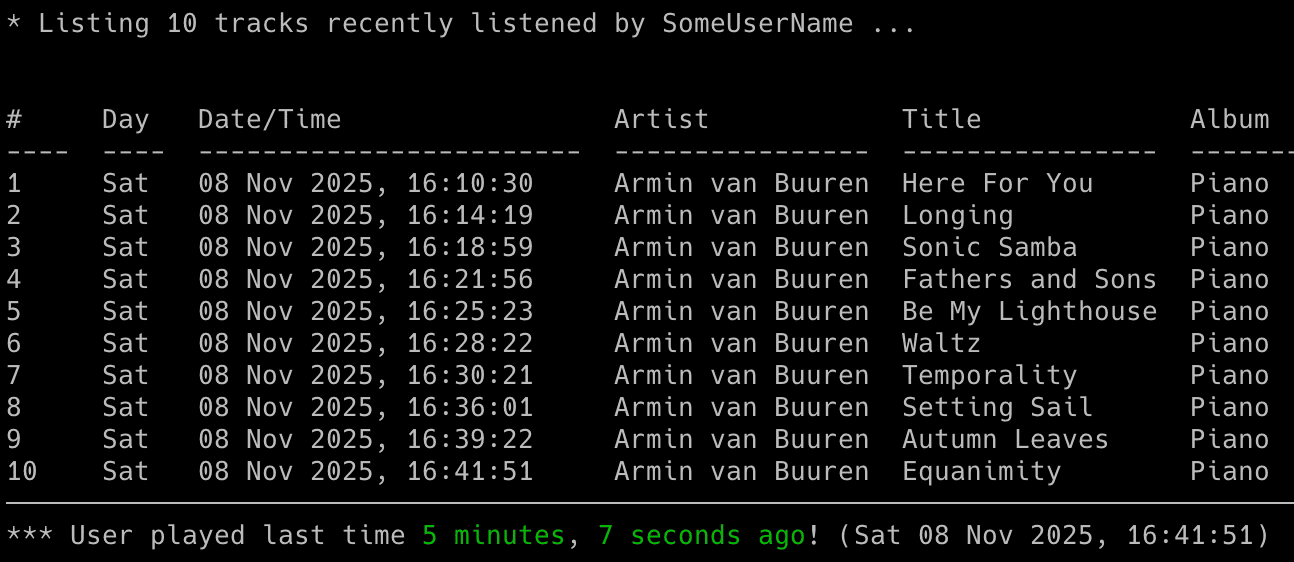
If you want to not only display, but also save the list of recently listened track to a CSV file, use the -l flag with -b indicating the CSV file. As before, you can add the -n flag to specify how many tracks should be displayed/saved:
Email Notifications
To enable email notifications when a user becomes active:
- set ACTIVE_NOTIFICATION to True
- or use the -a flag
To be informed when a user gets inactive:
- set INACTIVE_NOTIFICATION to True
- or use the -i flag
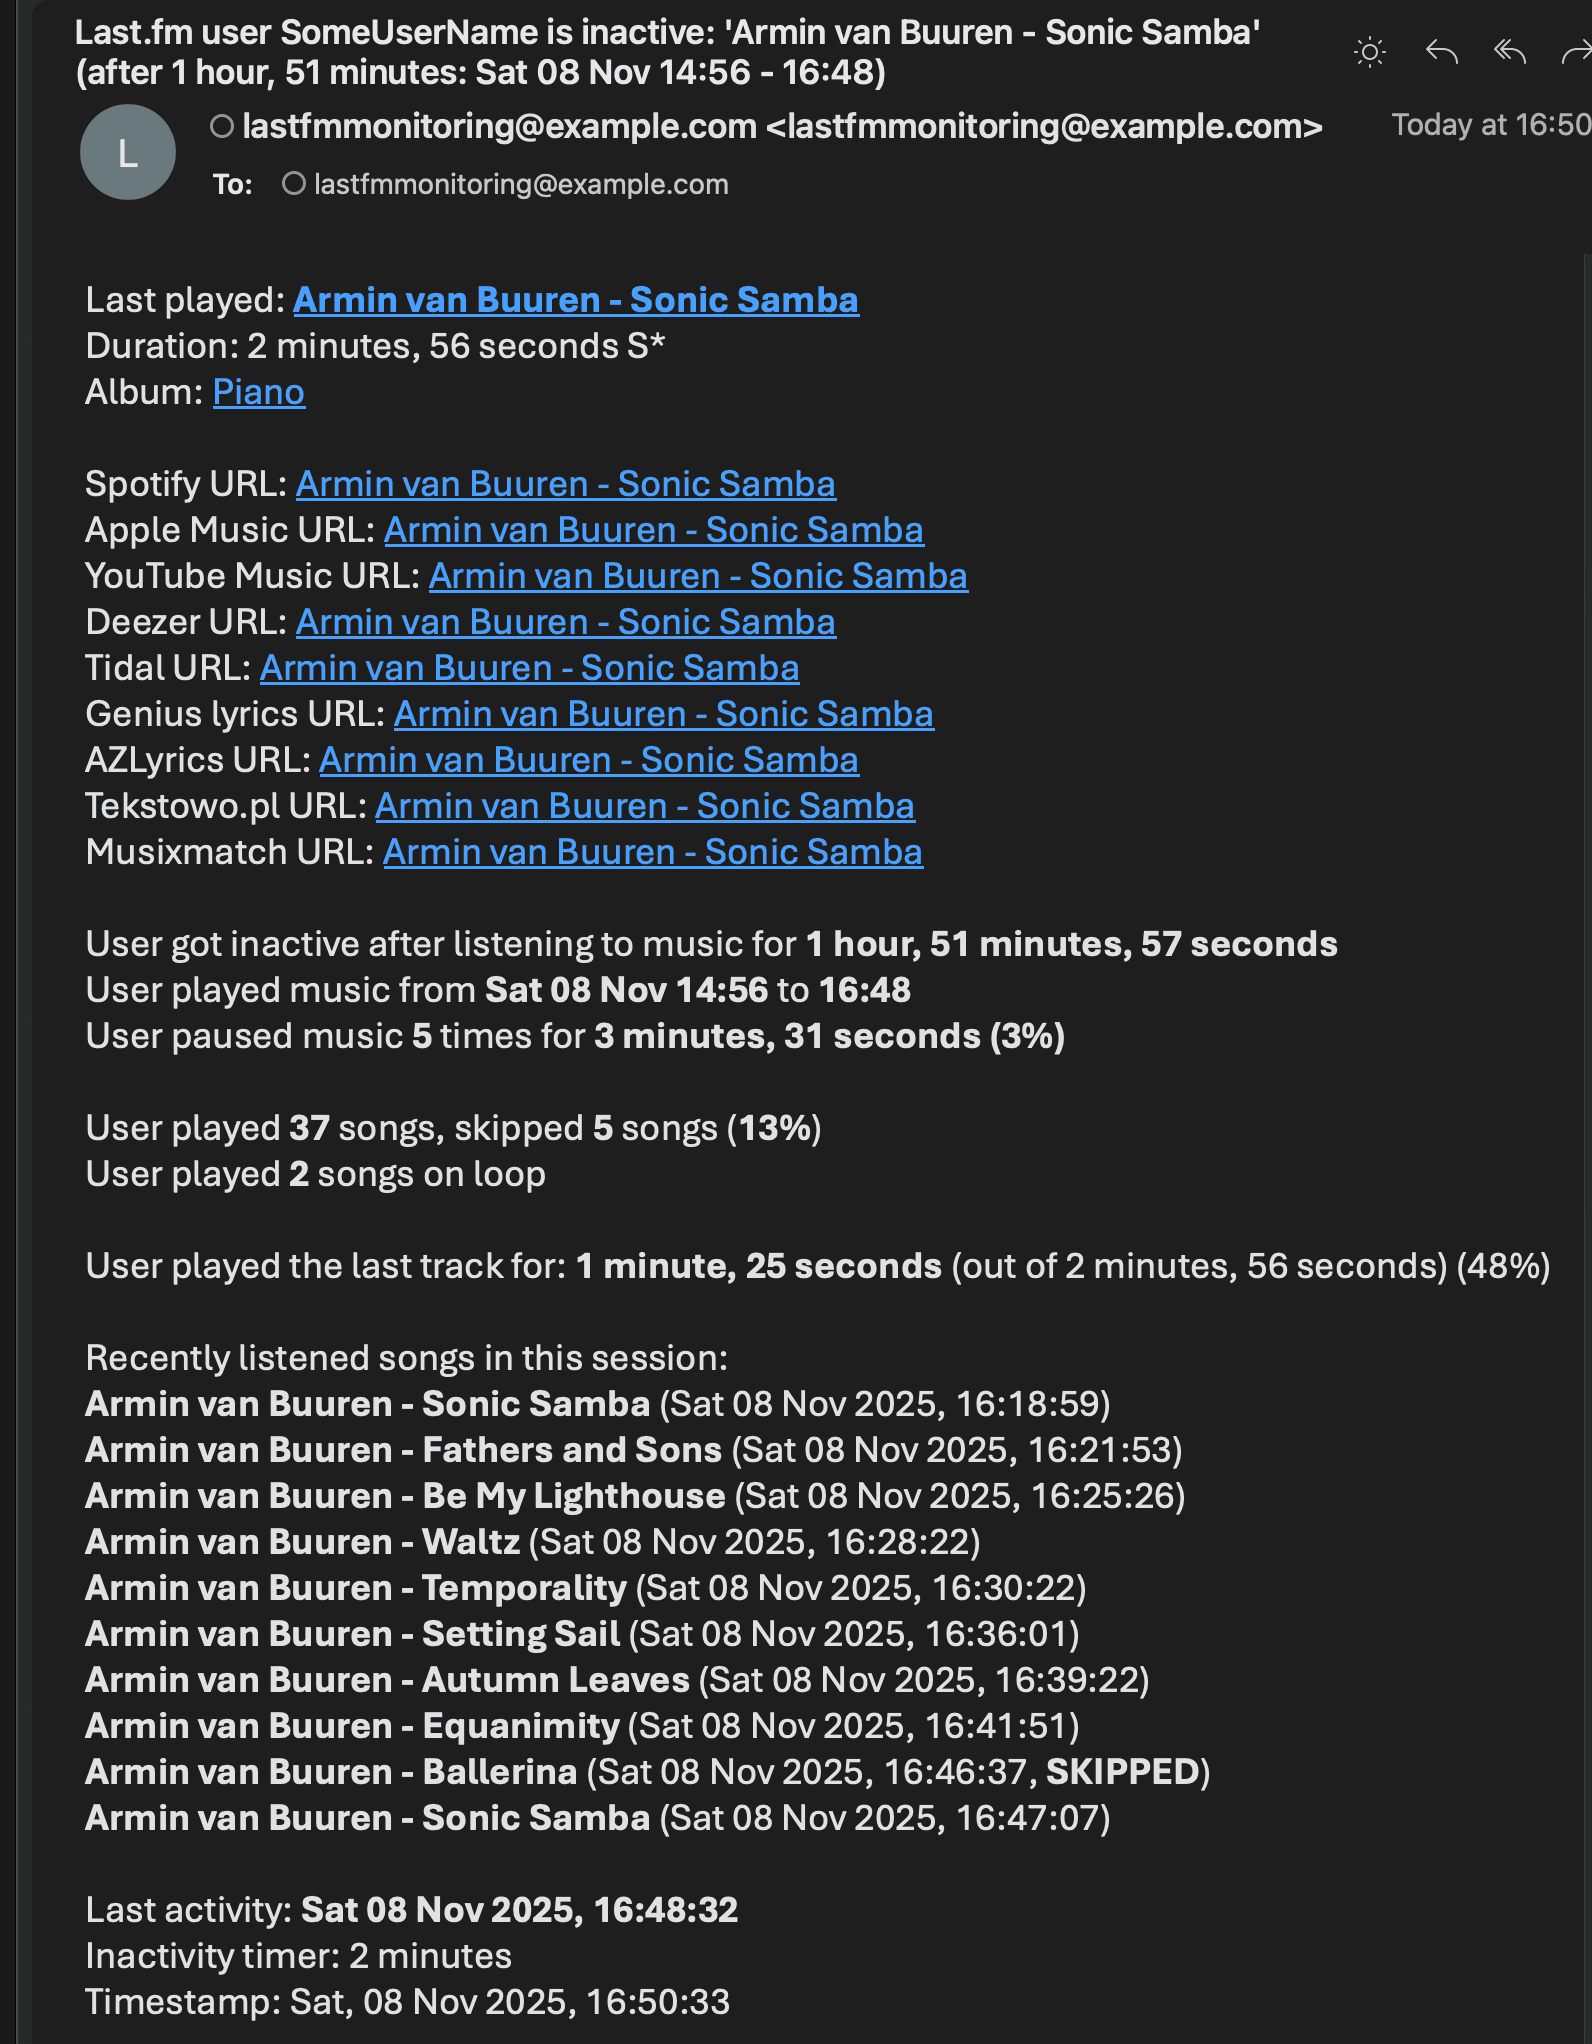
Inactivity emails include recent songs from the session with skipped and continued track status. Configure the number of recent songs to include via the INACTIVE_EMAIL_RECENT_SONGS_COUNT configuration option.
To be notified when new entries appear when the user is offline:
- set OFFLINE_ENTRIES_NOTIFICATION to True
- or use the -f flag
To get email notifications when a monitored track or album plays:
- set TRACK_NOTIFICATION to True
- or use the -t flag
For that feature you also need to create a file with a list of songs you want to track (one track or album per line). Specify the file using the MONITOR_LIST_FILE or -s flag:
Example file lastfm_tracks_username:
You can comment out specific lines with # if needed.
Then run the tool with -t and -s flags:
To enable email notifications for every song listened by the user:
- set SONG_NOTIFICATION to True
- or use the -j flag
To be notified when a user listens to the same song on loop:
- set SONG_ON_LOOP_NOTIFICATION to True
- or use the -x flag
To disable sending an email on errors and the recovery alert that follows (enabled by default):
- set ERROR_NOTIFICATION to False
- or use the -e / --no-error-notify flag
Email and webhook error alerts are sent after 2 minutes of a continuing failure. Problems that need your action, such as a rejected API key, alert immediately. The subject reads Last.fm Monitor error: <what went wrong> (user: <lastfm_username>) and the alert lists the fix, a guide link, how many checks failed in a row, since when and when the next check runs. Each kind of failure alerts once per channel. Failed deliveries are retried after 5 minutes, with increasing waits up to an hour.
When the failure clears, a Last.fm Monitor recovered alert goes to every channel that received the failure alert, naming how long the outage lasted and what it was. A channel that could not receive the failure alert while the outage lasted is told about the failure and its recovery together, so a blocked channel is not left without any word of an outage. A later outage alerts again. -e / --no-error-notify switches off both the email failure alert and its recovery alert, and --no-webhook-error-notify does the same for the webhook.
To be notified when a user's followers change:
- set FOLLOWERS_NOTIFICATION to True
- or use the --notify-followers flag
To be notified when a user's followings (friends) change:
- set FOLLOWINGS_NOTIFICATION to True
- or use the --notify-followings flag
Notifications for changed followers and/or followings are only sent if tracking functionality is enabled (--track-followers and/or --track-followings flags).
To track changes to the editable About You text shown publicly as About Me or the user's display name:
Set PROFILE_NOTIFICATION to True or add --notify-profile to send email for confirmed profile changes. Each field is independently controlled through TRACK_BIO / --track-bio and TRACK_DISPLAY_NAME / --track-display-name. The baseline is stored in lastfm_<lastfm_username>_profile.json.
You can also decide to use Last.fm or Spotify URL in "Last played:" / "Track:" field in HTML email notifications (see USE_LASTFM_URL_IN_LAST_PLAYED config option).
Make sure you defined your SMTP settings earlier (see SMTP settings).
Example email:
Webhook Notifications
Webhook event choices mirror email controls while remaining independent. Enable the master switch in the config file or for one run:
Choose events with config settings or matching command-line flags:
| Event | Config setting | Command-line flag |
|---|---|---|
| User becomes active | WEBHOOK_ACTIVE_NOTIFICATION |
--webhook-active |
| User becomes inactive | WEBHOOK_INACTIVE_NOTIFICATION |
--webhook-inactive |
| Monitored track or album plays | WEBHOOK_TRACK_NOTIFICATION |
--webhook-track |
| Every song change | WEBHOOK_SONG_NOTIFICATION |
--webhook-song-changes |
| Song plays on loop | WEBHOOK_SONG_ON_LOOP_NOTIFICATION |
--webhook-loop |
| Offline scrobbles arrive | WEBHOOK_OFFLINE_ENTRIES_NOTIFICATION |
--webhook-offline-entries |
| Followers change | WEBHOOK_FOLLOWERS_NOTIFICATION |
--webhook-followers |
| Followings change | WEBHOOK_FOLLOWINGS_NOTIFICATION |
--webhook-followings |
| Tracked bio or display name changes | WEBHOOK_PROFILE_NOTIFICATION |
--webhook-profile |
| Monitoring error occurs or clears | WEBHOOK_ERROR_NOTIFICATION |
--webhook-errors |
An event flag also enables the master switch for that run. Use --no-webhook to disable configured webhook delivery. Use --no-webhook-error-notify to disable the error webhook and the recovery webhook that follows it. Both carry the same title and text as the matching email, without the timestamp line.
Examples:
lastfm_monitor <lastfm_username> --webhook-active --webhook-inactive
lastfm_monitor <lastfm_username> --webhook-song-changes --webhook-loop
lastfm_monitor <lastfm_username> --track-followers --webhook-followers
Email and webhook delivery attempts remain independent. When loop, monitored-track and every-song choices overlap, Last.fm Monitor sends no more than one alert per channel for that song change.
See Webhook Settings for Discord, ntfy, private URL setup, test delivery and advanced request customization.
CSV Export
If you want to save all listened songs to a CSV file, set CSV_FILE or use -b flag:
The file will be automatically created if it does not exist.
Last.fm Wrapped Tool
The lastfm_wrapped.py script generates Spotify Wrapped-style statistics from CSV files created by lastfm_monitor.py.
It analyzes your listening data and provides insights including top artists, tracks and albums for a specified time period.
Basic Usage:
By default, it generates statistics for the current year (January 1 to November 15, similar to Spotify Wrapped):
Custom Date Range:
You can specify a custom date range using --from and --to flags:
Top N Items:
By default, it shows the top 5 items in each category, just like Spotify Wrapped. You can change this with the --top-n flag:
Example Output:
The tool displays: - Total scrobbles for the period - Top artists (by play count) - Top tracks (by play count) - Top albums (by play count)
Automatic Playback of Listened Tracks in the Spotify Client
If you want the tool to automatically play the tracks listened to by the user in your local Spotify client:
- set TRACK_SONGS to True
- or use the -g flag
Your Spotify client needs to be installed and running for this feature to work.
Automatic playback needs a Spotify track ID for every scrobble. The tool resolves that ID through the Spotify metadata backends. It tries the official OAuth app Web API when credentials are configured, then uses the anonymous web-player backend. OAuth app credentials are optional.
The local playback action itself uses the configured platform method such as AppleScript on macOS or D-Bus on Linux. It does not use Spotify Web API playback control.
The tool fully supports automatic playback on Linux and macOS. This means it will automatically play the changed track. It will also automatically pause and resume playback following the tracked user's actions. Additionally, it can pause or play an indicated track once the user becomes inactive (see the SP_USER_GOT_OFFLINE_TRACK_ID configuration option).
For Windows, it works in a semi-automatic way: if you have the Spotify client running and you are not listening to any song, then the first track will play automatically. However, subsequent tracks will be located in the client, but you will need to press the play button manually.
You can change the playback method per platform using the corresponding configuration option.
For macOS set SPOTIFY_MACOS_PLAYING_METHOD to one of the following values:
- "apple-script" (recommended, default)
- "trigger-url"
For Linux set SPOTIFY_LINUX_PLAYING_METHOD to one of the following values:
- "dbus-send" (most common one, default)
- "qdbus" (try if dbus-send does not work)
- "trigger-url"
For Windows set SPOTIFY_WINDOWS_PLAYING_METHOD to one of the following values:
- "start-uri" (recommended, default)
- "spotify-cmd"
- "trigger-url"
The recommended defaults should work for most people.
Progress Indicator
If you want to see a real-time progress indicator showing the exact minute and second of the track the user is currently listening to:
- set PROGRESS_INDICATOR to True
- or use the -p flag
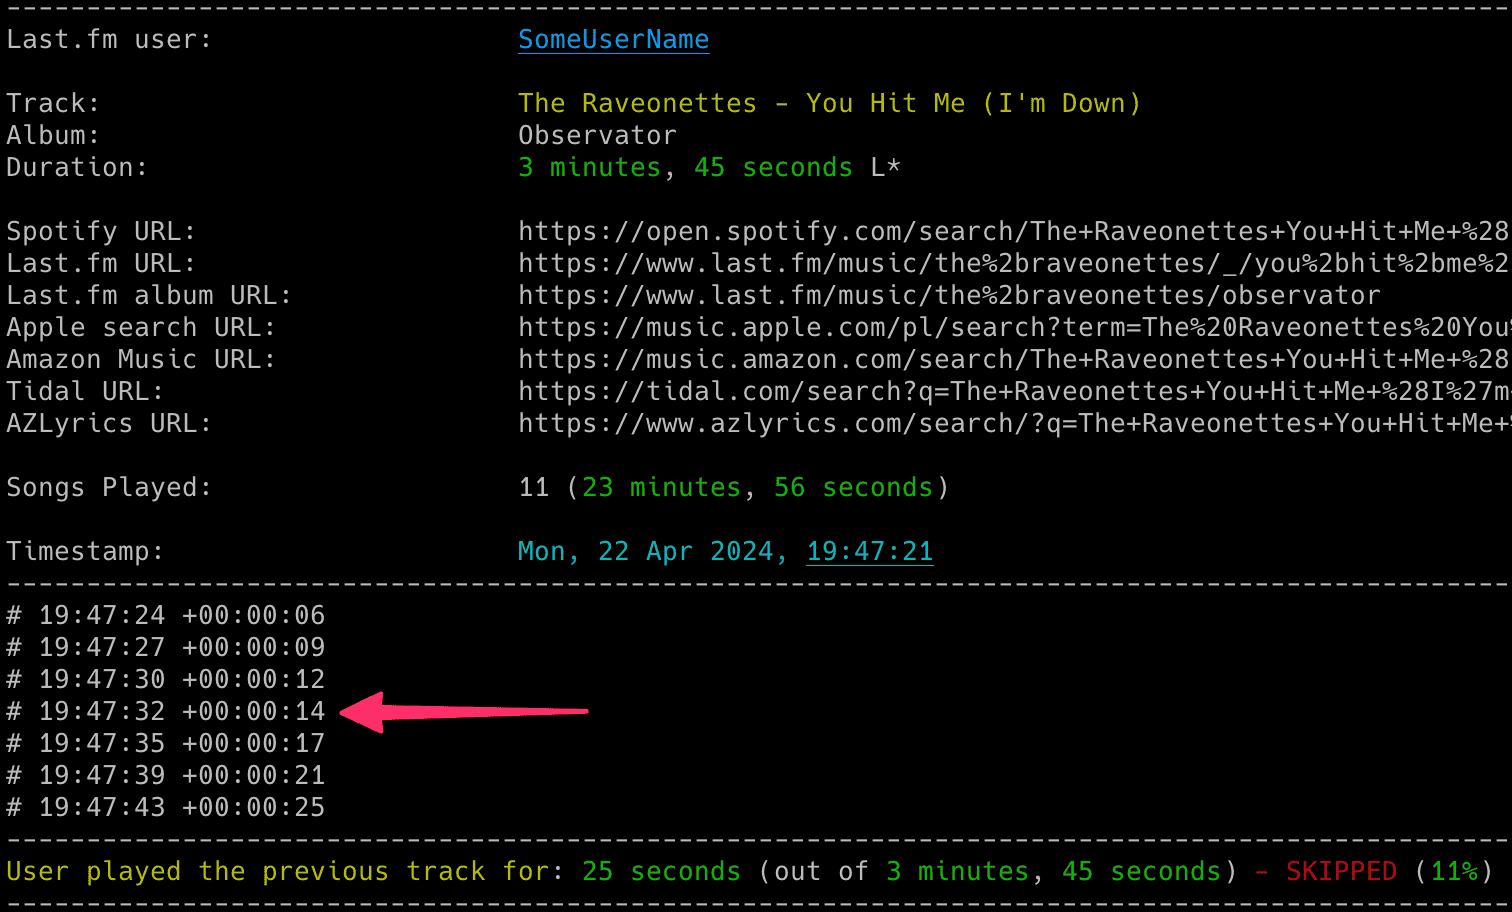
For this functionality to work correctly, it is suggested to set the active check interval (LASTFM_ACTIVE_CHECK_INTERVAL / -k flag) to a low value (such as 2-5 seconds).
Getting Track Duration from Spotify
If you want the tool to fetch the track duration from Spotify instead of Last.fm, which very often reports the wrong duration (or none at all):
- set USE_TRACK_DURATION_FROM_SPOTIFY to True
- or use the -r flag
Track duration is resolved through the Spotify metadata backends. The official OAuth app Web API is tried first when credentials are configured. The anonymous web-player backend runs next. Last.fm duration is used only if both Spotify backends fail or return incomplete metadata.
You will be able to tell if the track duration comes from Spotify as it has an S suffix at the end (e.g. 3 minutes 42 seconds S*), while those coming from Last.fm have an L (e.g. 2 minutes 13 seconds L*).
You can disable showing the track duration marks (L S) via the -q flag.
Duration marks are not displayed if the functionality to retrieve track duration from Spotify is disabled.
Private Mode Detection in Spotify
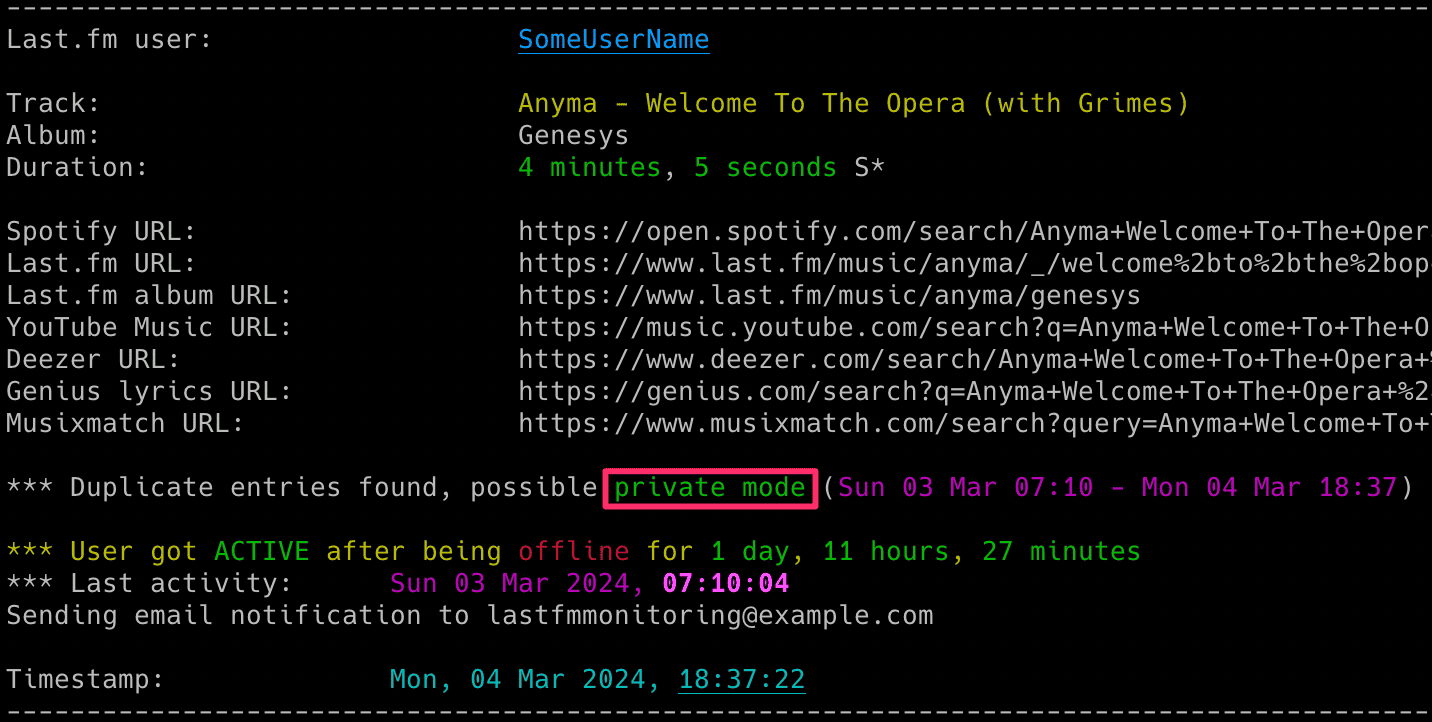
The tool includes functionality to detect when private mode is potentially used in Spotify and even estimates the duration of its usage. It is enabled by default and is not configurable.
It is not 100% accurate. I have observed that when private mode is used, especially for extended periods, it often results in many duplicate entries being created in a Last.fm account after private mode is disabled. This leads to different tracks having the same start timestamp.
I suspect this is related to a bug in Spotify and mainly occurs when the user has Spotify on multiple devices.
However, keep in mind that this is not 100% accurate. I have observed duplicate entries even without private mode, but in such cases, the number of duplicate entries is limited. Therefore, do not treat it as something completely certain, but it is a pretty good indicator that private mode was used.
Check Intervals
If you want to customize the polling intervals, use the -k and -c flags (or the corresponding configuration options):
LASTFM_ACTIVE_CHECK_INTERVAL,-k: check interval when the user is online, i.e. currently playing (seconds)LASTFM_CHECK_INTERVAL,-c: check interval when the user is considered offline, i.e. not playing music (seconds)
If you want to change the time required to mark the user as inactive (the timer starts once the user stops playing the music), use -o flag (or LASTFM_INACTIVITY_CHECK configuration option):
Friend and profile tracking checks every 90 minutes by default (FRIENDS_CHECK_INTERVAL = 5400). Set FRIENDS_CHECK_INTERVAL or --friends-check-interval in seconds to change it. Existing saved values still apply. This timer covers followings, followers, the About Me bio and the display name. It is independent from the music polling intervals.
To avoid false notifications caused by transient Last.fm responses, friend and profile changes are only confirmed after a number of consecutive checks (default: 3). You can configure this via the FRIENDS_CHANGE_COUNTER option or --friends-change-counter flag. This setting also controls the threshold for suppressing repeated error messages.
You can also configure the retry timeout used when confirming transient changes or errors via FRIENDS_RETRY_INTERVAL configuration option or --friends-retry-interval flag.
When the check keeps failing, for example because Last.fm blocks or breaks the pages this feature reads, the retry timeout doubles after each failed attempt until it reaches FRIENDS_CHECK_INTERVAL. A short outage is still retried quickly, while an outage lasting hours settles at the normal check interval instead of retrying every FRIENDS_RETRY_INTERVAL seconds. The failure is reported once it reaches the FRIENDS_CHANGE_COUNTER threshold and then at most once an hour until it clears.
Liveness Reminder
While nothing changes, the tool prints one reminder that it is still running:
* Monitoring healthy for <lastfm_username>. The user is inactive with no activity change since the last check
Liveness check, timestamp:  Mon 08 Sep 2026, 09:15:05
The reminder is timed in seconds, so it arrives at the same rate whether the user is listening or not. Set LIVENESS_CHECK_INTERVAL to change it (default: 86400, i.e. 24 hours) or to 0 to switch it off.
Anything the tool prints about the user restarts the countdown, so a busy run stays quiet.
Signal Controls (macOS/Linux/Unix)
The tool has several signal handlers implemented which allow to change behavior of the tool without a need to restart it with new configuration options / flags.
List of supported signals:
| Signal | Description |
|---|---|
| USR1 | Toggle email notifications when user gets active/inactive or new offline entries show up (-a, -i, -f) |
| USR2 | Toggle email notifications for every song (-j) |
| URG | Toggle showing of progress indicator (-p) |
| CONT | Toggle email notifications for tracked songs (-t) |
| PIPE | Toggle email notifications when user plays song on loop (-x) |
| TRAP | Increase the inactivity check timer (by 30 seconds) (-o) |
| ABRT | Decrease the inactivity check timer (by 30 seconds) (-o) |
| HUP | Reload secrets from .env file |
SIGHUP keeps command-line credentials and nonempty environment values exported before startup. Change those values and restart to replace them.
Send signals with kill or pkill, e.g.:
As Windows supports limited number of signals, this functionality is available only on Linux/Unix/macOS.
Coloring Log Output with GRC
You can use GRC to color logs.
The bundled recipe follows the same colors as the live output. It also covers the other monitors in the family, so one copy in ~/.grc/ colors every tool's logs.
Add to your GRC config (~/.grc/grc.conf):
Now copy the conf.monitor_logs to your ~/.grc/ and log files should be nicely colored when using grc tool.
Example: